 by
by We demonstrate in this post how you can build your own Near Miss Accident Reporting App using Power Apps, SharePoint.
The Part 2 Post will demonstrate how using Power Automate your Health & Safety Administrator will be aware of each report immediately it is made.
Fact: In the workplace when near misses occur, then accidents are sure to follow.
Research has shown that for every 90 near misses an accident will occur. And while the exact numbers may vary, near-misses are a warning sign that something is going wrong.
Reporting of near misses reduces accidents and improves safety. They help you to find out what went wrong, fix problems, and learn lessons. Let Power Apps help.
I will show you how, using Power Platform and SharePoint, you can build your own in-house Near Miss Reporting App.
For Near Miss Reporting with Power Apps, you will need:
- An Office 365 Subscription
- A SharePoint List
- A Canvas Power App
- A Power Automate Workflow
Step 1 – First, we need to create the SharePoint List
- In a New List named NearMissReports create the following columns:
- Location: (Single line of text)
- Description: (Multiple lines of text)
- Date: (Short date)
- Allow Attachments: (This should be enabled by default)
Step 2 – Create the Canvas Power App
- From within Power Apps
- Click > Create, Choose > Canvas app from blank
- Name the App Near Miss Reporting
- Choose Phone Format
- Click Create
Step 3 – Connect the SharePoint list to your new App
- Data > Add Data > Connectors > SharePoint
- Navigate to your SharePoint List
Step 4 – Insert a Form into Your App
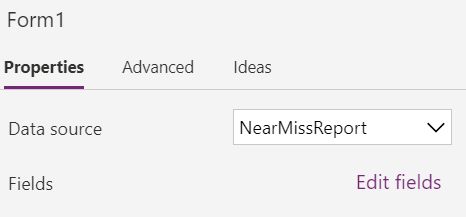
- Insert > Form > Edit Type
- Link your form to the Data Source
Step 5 – Add a Button
Add a button at the foot of the screen.
Select the OnSelect action of the Button
Type: SubmitForm(FormName)

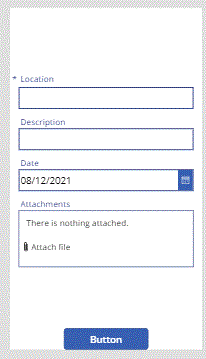
Your Power App Screen should look something like the image on the right.
Some Changes
I have changed the default date to Now() as opposed to the default Hint Text.
To do that you need to unlock the Date Picker Control and replace the Default of “Parent.Default” with Now( ) or Today( ).
Next change the Button text Property to “Submit” or “Save”
Unlock the Description control and enlarge the Text input box. You can also change the title of the Control to something more user friendly like ” Describe what happened”.
Similarly you can change the “Location” Control. if you have a limited set of locations you could change the Text Input of the control to a dropdown list of choices. The format of the items property of the dropdown would be
[“Area 1″,”Area 2″,”Area3”]